티스토리 뷰
개념
리소스의 갱신과 생성을 나타내며, 리소스가 없으면 생성을 하고 있으면 업데이트를 하여 변경해 준다. 처음에는 데이터가 생성이 되고 그 후 부터는 업데이트 되므로 하나의 데이터기때문에 멱등하다고 할 수 있다. 그리고 잘못된 데이터가 전송되더라도 업데이트를 시키므로 안정성이 있다고는 할 수 없다.
PathVariable로 get과 동일하게 코드가 가능하다. Body로 데이터 전송이 가능하기 때문에 Query Parameter는 가지지 않는 것이 권장 된다.
프로젝트 생성_PUT 받기
> Dependencies는 spring web으로 만들면 된다. 그리고 PutApiController라는 클래스를 아래와 같이 만들어준다.

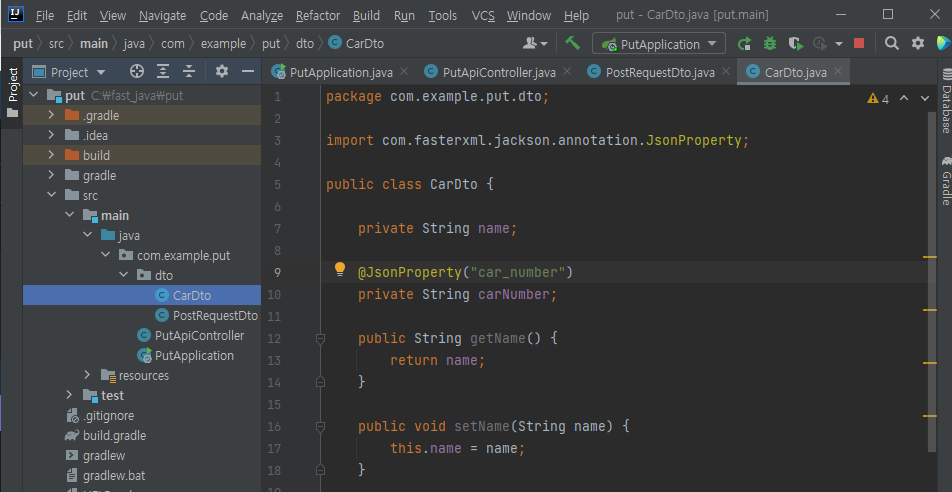
아래와 같이 dto 패키지를 만들고, CarDto class를 우선 만들어 준다.

아래의 코드를 살펴보면, @JsonPreperty 부분은 사실상 아래의 JSON을 확정 짓고 만드는 부분이다. 그리고 아래에 나오는 PostRequestDto.java를 우선적으로 만들고, 리스트 부분을 만든 것임을 이해해야한다.
package com.example.put.dto;

import com.fasterxml.jackson.annotation.JsonProperty;

public class CarDto {

    private String name;

    @JsonProperty("car_number")
    private String carNumber;

    public String getName() {
        return name;
    }

    public void setName(String name) {
        this.name = name;
    }

    public String getCarNumber() {
        return carNumber;
    }

    public void setCarNumber(String carNumber) {
        this.carNumber = carNumber;
    }

    @Override
    public String toString() {
        return "CarDto{" +
                "name='" + name + '\'' +
                ", carNumber='" + carNumber + '\'' +
                '}';
    }
}
dto 패키지 내부에 PostRequestDto.java도 아래와 같이 만들어 주자.

아래에서 보면 List 가 포함되어 있는 것을 알 수 있다. list부분의 클래스를 위에서 만든 것이라 생각하면 된다.
package com.example.put.dto;

import com.fasterxml.jackson.databind.PropertyNamingStrategy;
import com.fasterxml.jackson.databind.annotation.JsonNaming;

import java.util.List;

@JsonNaming(value = PropertyNamingStrategy.SnakeCaseStrategy.class)
public class PostRequestDto {

    private String name;
    private int age;
    private List<CarDto> carList;

    public String getName() {
        return name;
    }

    public void setName(String name) {
        this.name = name;
    }

    public int getAge() {
        return age;
    }

    public void setAge(int age) {
        this.age = age;
    }

    public List<CarDto> getCarList() {
        return carList;
    }

    public void setCarList(List<CarDto> carList) {
        this.carList = carList;
    }

    @Override
    public String toString() {
        return "PostRequestDto{" +
                "name='" + name + '\'' +
                ", age=" + age +
                ", carList=" + carList +
                '}';
    }
}
List에서 alt+enter를 사용해서 List를 활성화 시킨다.
List<CarDto>에서 ctrl하고 마우스 클릭을 하면 CarDto를 지정한 곳으로 넘어간다.
PutApiController에도 api를 받을 수 있도록 코드를 작성하자.

Api설정을 아래와 같이 완성해 주자.
package com.example.put;


import com.example.put.dto.PostRequestDto;
import org.springframework.web.bind.annotation.PutMapping;
import org.springframework.web.bind.annotation.RequestBody;
import org.springframework.web.bind.annotation.RequestMapping;
import org.springframework.web.bind.annotation.RestController;

@RestController
@RequestMapping("/api")
public class PutApiController {

    @PutMapping("/put")
    public void put(@RequestBody PostRequestDto requestDto) {
        System.out.println(requestDto);
    }
}
JSON 디자인
> 코드작성한 것을 보고 똑같게 설계를 해주면 된다.
public class PostRequestDto {

    private String name;
    private int age;
    private List<CarDto> carList;

    public String getName() {
        return name;
    }
이렇게 되어 있다면 밖에부터 name과 age를 설계해준다. 그리고 carList를 만들어 주면 된다. carList부분은 ctrl+enter해서 변수 선언한 부분에 가서 리스트를 체워주면된다.
{
    "name" : "hanpy",
    "age" : "30",
    "car_list" : [
        {
            "name" : "BMW",
            "car_number" : "77허 7777"
        },
        {
            "name" : "A7",
            "car_number" : "77가 1111"
        }
    ]
}
위의 내용은 hanpy라는 사용자가 car를 등록하거나 update하는 경우가 될 것이다.
클래스에 대한 전부를 같은 룰 적용시는 방법으로 JsonNaming이 있다.
value를 ctrl+클릭으로 들어갈 수 있다. 네이밍 룰을 설정가능하다. 복사해서 하면 된다. @JsonProperty는 한가지 변수에 대에 이름을 지어준다면, @JsonNaming은 해당 클래스에 네이밍 룰을 적용할 수 있다.

이러한 방식으로 send를 보내보자.
인텔리J에서는 출력값이 아래와 같이 나옴을 확인 할 수 있다.
PostRequestDto{name='hanpy', age=30, carList=[CarDto{name='BMW', carNumber='77허 7777'}, CarDto{name='A7', carNumber='77가 1111'}]}
@RestController 같은 경우는 object자체를 리턴시키면 object mapper를 통해서 JSON으로 변경해 준다. 아래와 같이 코드를 작성하면 내가 받은 데이터를 그대로 리턴한다.
package com.example.put;


import com.example.put.dto.PostRequestDto;
import org.springframework.web.bind.annotation.PutMapping;
import org.springframework.web.bind.annotation.RequestBody;
import org.springframework.web.bind.annotation.RequestMapping;
import org.springframework.web.bind.annotation.RestController;

@RestController
@RequestMapping("/api")
public class PutApiController {

    @PutMapping("/put")
    public PostRequestDto put(@RequestBody PostRequestDto requestDto) {
        System.out.println(requestDto);
        return requestDto;
    }
}
위와 같이 void부분과 return 부분을 넣어서 요청을 보내면, 아래와 같은 응답을 확인할 수 있다.

즉, 굳이 Json을 문자열로 만드는 로직 없이 클래스에 지정한 이름의 룰을 가지고 자동으로 response로 JSON을 보내도록 개발이 가능하다.
pathvariable
{}안의 변수 이름은 아래와 같이 method에서 선언한 변수 이름과 일치해야한다.
package com.example.put;


import com.example.put.dto.PostRequestDto;
import org.springframework.web.bind.annotation.*;

@RestController
@RequestMapping("/api")
public class PutApiController {

    @PutMapping("/put/{userId}")
    public PostRequestDto put(@RequestBody PostRequestDto requestDto, @PathVariable Long userId) {
        System.out.println(requestDto);
        return requestDto;
    }
}
만약 일치하기가 어렵다면, 아래와 같이 pathvariable의 name이라는 속성을 넣어줘야한다.
package com.example.put;


import com.example.put.dto.PostRequestDto;
import org.springframework.web.bind.annotation.*;

@RestController
@RequestMapping("/api")
public class PutApiController {

    @PutMapping("/put/{userId}")
    public PostRequestDto put(@RequestBody PostRequestDto requestDto, @PathVariable(name = "userId") Long id) {
        System.out.println(id);
        return requestDto;
    }
}
url은 아래와 같이 보내주면 프린터 값은 100이 출력되는 것을 확인 할 수 있다.
//put

http://localhost:8080/api/put/100'Platform > spring boot' 카테고리의 다른 글
| [spring boot] Object Mapper (0) | 2021.06.21 |
|---|---|
| [intellij] OpenJDK 64-Bit Server VM warning (0) | 2021.06.20 |
| [sping boot] response 방법 (1) | 2021.06.19 |
| [spring boot] POST 방식 (0) | 2021.06.13 |
| [spring boot] 8080 포트 변경 (0) | 2021.06.08 |
- Total
- Today
- Yesterday
- useState
- Vue
- Python
- nodejs
- read_csv
- typescript
- pandas
- 자연어처리
- login
- NextJS
- django
- logout
- nextjs autoFocus
- mongoDB
- useHistory 안됨
- 클라우데라
- react
- Queue
- next.config.js
- react autoFocus
- Express
- error:0308010C:digital envelope routines::unsupported
- 자료구조
- vuejs
- TensorFlow
- UserCreationForm
- DFS
- Deque
- BFS
- JavaScript
| 일 | 월 | 화 | 수 | 목 | 금 | 토 |
|---|---|---|---|---|---|---|
| 1 | 2 | 3 | 4 | 5 | 6 | 7 |
| 8 | 9 | 10 | 11 | 12 | 13 | 14 |
| 15 | 16 | 17 | 18 | 19 | 20 | 21 |
| 22 | 23 | 24 | 25 | 26 | 27 | 28 |
