티스토리 뷰
반응형
0.들어가면서
tensorflow를 처음 공부하면 tf.keras.layers.Dense가 무슨말인가 공식문서를 봐도 잘 모를 것이다. 그래서 간단히 설명해 볼까 한다. tf.keras.layers.Dense 이건 바로 신경망을 만드는 것이다.
1. 신경망

신경망은 위의 그림에서 처럼 input=> activation funtion(화살표) => Hidden(output이자 input) => activation function => Output 으로 된다.
식, y = f(Wx+b)
- f(): 활성화 함수
- W: 가중치
- x: input data
- y: output data
2. tf.keras.layers.Dense
신경망을 이해할 때 사용하는 모듈이 바로 tf.keras.layers.Dense이다. tf.keras.layers.Dense는 input을 넣었을 때 output으로 바꿔주는 중간 다리라고 생각하면 된다. 사용법은 아래와 같다.
1. 객체 생성 후에 입력값 넣기
dense = tf.keras.layers.Dense(units, ...)
output = dense(input)
2., 객체 생성과 입력값을 동시에 넣기
ouput = tf.keras.layers.Dense(units, ...)(input)
3. Dense에 들어가는 옵션
    units,
    activation = None,
    use_bias = True,
    kernel_initializer = 'glorot_uniform',
    bias_iniotializer = 'zeros',
    kernel_regularizer = None,
    bias_regularizer = None,
    activity_regularizer = None,
    kernel_constraint = None,
    bias_constraint = None,
**kwargs- units : 출력 값의 크기
- activation : 활성화 함수
- use_bias : 편향(b)을 사용할지 여부
- kernel_initializer : 가중치(W) 초기화 함수
- bias_iniotializer : 편향 초기화 함수
- kernel_regularizer : 가중치 정규화 방법
- bias_regularizer : 편향 정규화 방법
- activity_regularizer : 출력 값 정규화 방법
- kernel_constraint : 가중치에 적용되는 부가적인 제약 함수
- bias_constraint : 편향에 적용되는 부가적인 제약 함수
3. 예시를 보자
input = tf.placeholder(tf.float32, shape = (5, 1))
output = tf.keras.layers.Dense(units = 3, activation = tf.nn.sigmoid)(input)
처음 input 뉴런이 5개이고 그 뉴련들이 3개의 output을 가리키는 신경망이다. 아래 그림의 코드도 작성해 보자.

input = tf.placeholder(tf.float32, shape = (3, 1))
hidden = tf.keras.layers.Dense(units = 5, activation = tf.nn.sigmoid(input)
output = tf.keras.layers.Dense(units = 3, activation = tf.nn.sigmoid(hidden)
+ 신경망 함수
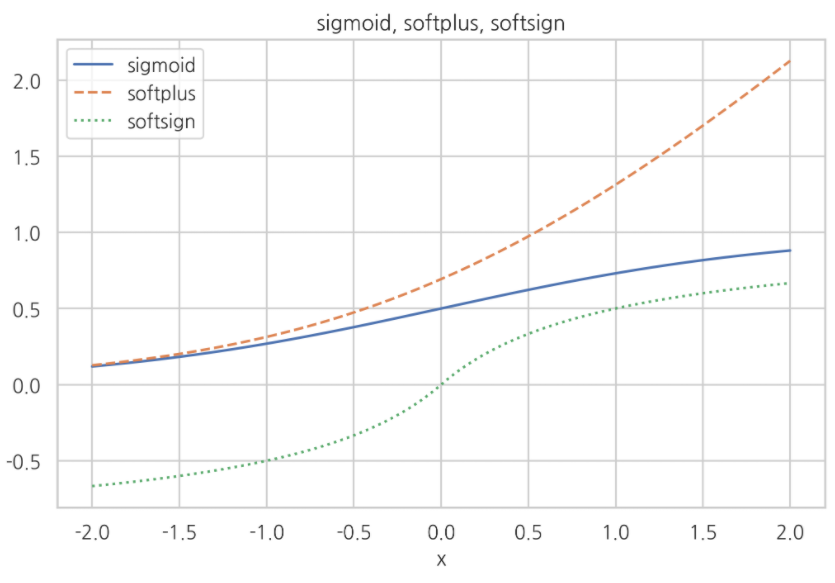
아래의 함수는 nn 서브 패키지에서 신경망에서 쓰이는 함수들도 구현되어 있다.
- tf.nn.sigmoid: 로지스틱 함수
- tf.nn.softplus: 소프트플러스 함수
- tf.nn.softsign: 소프트사인 함수
x = tf.linspace(-2.0, 2, 1000)
y1 = tf.nn.sigmoid(x)
y2 = tf.nn.softplus(x)
y3 = tf.nn.softsign(x)

plt.plot(x, y1, "-", label="sigmoid")
plt.plot(x, y2, "--", label="softplus")
plt.plot(x, y3, ":", label="softsign")
plt.xlabel("x")
plt.title("sigmoid, softplus, softsign")
plt.legend()
plt.show()
반응형
'인공지능(Artificial Intelligence) > Tensorflow' 카테고리의 다른 글
| [tensorflow] 모델 만들기_기초 (0) | 2020.11.14 |
|---|---|
| [tensorflow] 케라스 모델 간단히 구현해보기 (0) | 2020.10.29 |
| [tensorflow] 손실함수 정리 (0) | 2020.10.29 |
| 아무것도 모르고 시작하는 TensorFlow_1 (0) | 2020.07.31 |
| Tensorflow Lite 시작하기(+라즈베리파이) (0) | 2020.07.31 |
공지사항
최근에 올라온 글
최근에 달린 댓글
- Total
- Today
- Yesterday
링크
TAG
- react autoFocus
- BFS
- login
- pandas
- logout
- next.config.js
- Queue
- read_csv
- UserCreationForm
- mongoDB
- django
- Vue
- Express
- Python
- JavaScript
- NextJS
- DFS
- vuejs
- error:0308010C:digital envelope routines::unsupported
- useHistory 안됨
- TensorFlow
- 자연어처리
- useState
- nodejs
- 클라우데라
- typescript
- react
- Deque
- nextjs autoFocus
- 자료구조
| 일 | 월 | 화 | 수 | 목 | 금 | 토 |
|---|---|---|---|---|---|---|
| 1 | 2 | 3 | 4 | 5 | 6 | 7 |
| 8 | 9 | 10 | 11 | 12 | 13 | 14 |
| 15 | 16 | 17 | 18 | 19 | 20 | 21 |
| 22 | 23 | 24 | 25 | 26 | 27 | 28 |
글 보관함
